Imagine a touch of autumn’s rich tapestry adorning your living space, a handcrafted piece that whispers of crisp air and golden hues. You can achieve this enchanting look with a surprisingly simple project: creating your own wax-dipped leaf garland. Forget complicated techniques or expensive materials; this DIY endeavor transforms everyday craft supplies into a sophisticated, layered decoration that will captivate your guests.
This guide will walk you through every step, empowering you to craft a garland that looks as though it was plucked from a high-end boutique. You’ll be amazed at how accessible this project is, requiring only a few basic crafting skills. Get ready to unlock your creative potential and bring the warmth of fall indoors.
Gather Your Autumnal Palette: What You’ll Need
Before you begin, ensure you have all your supplies ready. This will make the crafting process smooth and enjoyable. You’ll be surprised at how these common items can be transformed into something truly special.
Here’s a list of what you’ll need to bring this beautiful garland to life:
- Faux Fabric Leaves: You’ll want approximately 36 fabric maple leaves, ideally between 3 to 5 inches in width. These will form the base of your garland.
- Crayons: Select a variety of warm autumn colors. Think rich oranges, deep reds, golden yellows, and earthy browns. You’ll need enough to fill two small pans.
- Jute Twine: A length of about 7 feet will serve as the sturdy foundation for your garland.
- Parchment Paper: This is essential for preventing your beautiful wax-dipped leaves from sticking to your work surface.
- Aluminum Pans: Two shallow pans, perfect for melting your crayons.
- Newspaper: To protect your workspace from any stray wax drips.
- Wooden Skewers: For gently swirling the melted crayon colors.
- Scissors: For cutting your twine and any optional embellishments.
- Hot Glue Gun and Glue Sticks: Your primary tool for attaching the leaves to the twine.
- Optional: Fine Gold Glitter: If you desire a touch of shimmer, a small amount will do.
- Optional: Floral Wire: For added reinforcement if needed.
- Optional: Ribbon: A few small pieces to add decorative bows.
The Art of Transformation: Melting Your Colors
The magic begins with transforming ordinary crayons into a luxurious, variegated wax. This step is crucial for achieving that rich, layered look. Take your time and enjoy the process of creating your unique color palette.
- Prepare Your Workspace: Start by covering your work area with newspaper. This will protect your table from any accidental drips. Also, line a separate surface or a baking tray with parchment paper; this is where your finished leaves will rest.
- Sort Your Leaves: Before you start dipping, it’s a good idea to sort your faux leaves. Grouping them by size will help you create a more balanced and full-looking garland later on.
- Color Your Creations: Break your crayons into smaller pieces. Divide your warm-colored crayons between the two aluminum pans. Aim for one pan to have a predominantly orange-gold hue and the other to lean towards a red-rust. This ensures a beautiful variation in your final garland.
- Gentle Melting: Melt the crayon pieces slowly. A double-boiler setup is ideal, or you can use very low heat. The goal is to get the wax fully liquid without scorching it.
- Marbling the Wax: Once the wax is melted, resist the urge to stir it vigorously. Instead, use a wooden skewer to gently swirl the colors. This will create a beautiful marbled effect, giving each leaf a unique pattern. Don’t overmix; you want distinct ribbons of color.
Dipping into Autumn: Creating Your Waxed Leaves
This is where your garland truly begins to take shape. Each leaf will be a unique work of art, thanks to the individual dipping process.
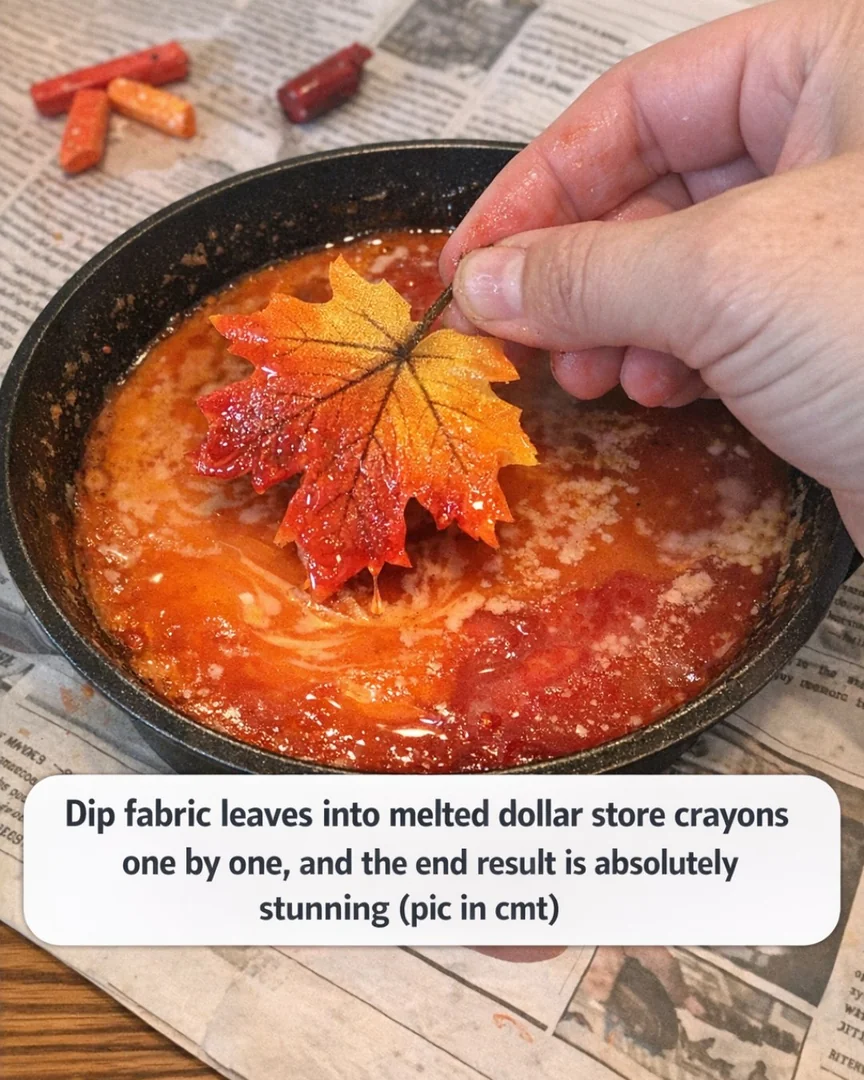
- Test the Dip: Before diving in with all your leaves, test one. Hold a leaf by its stem and dip just the top half into the melted wax. Lift it out quickly. You want the fabric to retain its shape, and the wax to coat it without making it overly heavy or soggy.
- Individual Perfection: Now, begin dipping your leaves one by one. Vary the depth and angle of each dip. Some leaves might have wax concentrated at their tips, while others might have it along their sides. This variation adds immense visual interest.
- Drip and Set: After dipping, let the excess wax drip back into the pan for a moment before carefully placing the leaf onto the parchment paper to cool.
- Layering Colors: Dip about half of your leaves in the orange-gold wax and the other half in the red-rust. For an extra touch of dimension, you can give a few leaf edges a quick second dip for a more layered color effect.
- A Touch of Sparkle (Optional): If you’re adding glitter, do this while the wax is still slightly tacky. Sprinkle a very light dusting of fine gold glitter onto about 8 to 10 leaves. This subtle shimmer will catch the light beautifully without overwhelming the natural look.
- Cooling Down: Allow all your dipped leaves to cool completely. This usually takes about 15 to 20 minutes. Gently flex each leaf to ensure it releases cleanly from the parchment paper and retains a natural, curved shape.
Building Your Masterpiece: Assembling the Garland
With your beautifully waxed leaves ready, it’s time to assemble them into a stunning garland. This is where your creativity in arrangement truly shines.
- Prepare Your Base: Take your 7-foot length of jute twine. Tie a small loop at each end. These loops will be your hanging points. Lay the twine out straight on your work surface.
- Plan Your Layout: Before you start gluing, arrange your leaves along the twine. Overlap each leaf by about 1 inch. Alternate the colors and sizes you’ve prepared. This step is crucial for ensuring your garland looks full and balanced, rather than sparse or patchy.
- The Gluing Process: Begin attaching the leaves to the twine. Use your hot glue gun to secure the stems and the lower back of each leaf. Press each leaf into place for a few seconds. Angle the leaves in different directions as you attach them; this creates movement and a fuller appearance.
- Reinforce for Durability (Optional): For any leaves that feel particularly heavy or if you want extra security, you can reinforce them. Wrap a short piece of floral wire around the twine and the leaf stem, twisting it tightly at the back where it won’t be visible from the front.
- Achieving Fullness: If you notice any thin spots, particularly towards the center or ends of your garland, fill them in. Glue a second layer of smaller leaves over the first row. This layering technique gives the garland that lush, complete look.
- Adding a Finishing Touch (Optional): To frame your beautiful leaves, tie three small ribbon bows. Use a rust or gold ribbon that complements your wax colors. Attach one bow at the center of the garland and one near each end. Keep these bows modest so they enhance, rather than compete with, the leaves.
Displaying Your Autumnal Gem
Your handcrafted garland is now complete and ready to transform your home. Consider where its beauty will be most appreciated.
- Find the Perfect Spot: Hang your garland on a mantelpiece, along a shelf edge, or across a doorway.
- Final Adjustments: Once hung, take a moment to fluff and adjust the angles of the leaves. Gently manipulate them so that the waxed surfaces catch the light. This final touch will make your garland appear full, polished, and truly alive with autumn’s glow.
Elevate Your Decor: Tips and Variations to Explore
You’ve created a beautiful garland, but there are always ways to personalize it further or adapt it to your specific style. Think of these as springboards for your own creative ideas.
- Deeper Autumn Hues: For a more subdued, late-autumn palette, consider adding more brown and burgundy crayons to one of your melting pans. Keep the other pan brighter with just orange and golden yellow for contrast.
- A Mix of Foliage: While maple leaves offer a dramatic shape, you can achieve an even more natural and layered look by incorporating other faux leaf shapes. Think oak or birch leaves mixed in with your maples for a less uniform, more organic feel.
- Safer Melting Practices: If you’re concerned about melting the crayons directly, a double boiler or a heatproof bowl set over simmering water is a much safer and more controlled method. This ensures the wax stays fluid without the risk of scorching.
- The Art of the Dip: Remember that quick dips often yield the prettiest results. If a leaf stays submerged for too long, the fabric can soften considerably, potentially losing that crisp leaf outline you’re aiming for.
- Embrace the Natural Finish: If you prefer a more understated look, simply skip the glitter. The marbled wax finish on its own is elegant and closer to classic harvest décor.
- For Wider Spaces: If you’re decorating a particularly wide mantel or a large wall space, don’t hesitate to increase the number of leaves. Using around 48 leaves and extending your jute twine to 9 feet will ensure the garland maintains its lush drape without appearing stretched.
- Storing Your Creation: To keep your beautiful garland looking its best for seasons to come, store it flat. Place it between sheets of parchment paper inside a shallow box. This prevents the waxed leaves from sticking to each other, especially in warmer temperatures.
Your Turn to Create Autumn Magic!
You’ve now seen how simple it is to craft a stunning wax-dipped leaf garland that brings the warmth and beauty of autumn into your home. This project is a fantastic way to personalize your decor and enjoy a rewarding crafting experience. Don’t let these beautiful ideas stay just on the page.
Ready to bring this touch of fall enchantment into your own space? Gather your supplies, unleash your creativity, and start crafting your unique wax-dipped leaf garland today. Share your finished creations and inspire others!

